¶ Introduction
The Case 1 Recovery
The Case 1 recovery is used when weather conditions allow for the Case 1 overhead stack and the Case 1 pattern, or more specifically, when the cloud ceiling is no lower than 3000' AGL and visibility is no lower than 5nm (WX 3000/5).
Recovery Overview
The Case I recovery begins when you contact the carrier Marshal with your 'MARKING MOMS' radio call. After receiving direction from Marshal, you will set up to enter the holding pattern over the carrier. At 10 miles, you should have the carrier in sight and report ’SEE YOU AT 10’ over the radio. The Marshal controller will hand you off to the tower and you will enter the holding stack.
If you've been assigned a marshal stack altitude above 2,000 feet, that means there are other jets already in the queue to land and will be in the stack below you. Once the lowest stack altitude (2,000 feet) is clear of any jets you will either 'collapse' automatically or be told to collapse
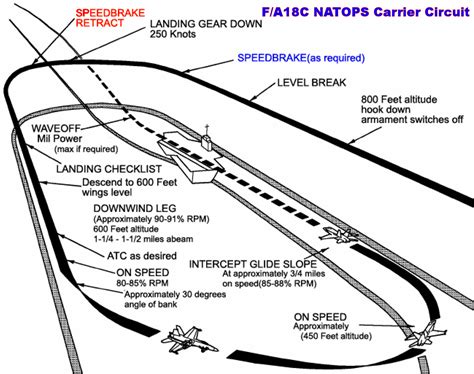
The tower will clear you to leave the holding pattern and commence your landing approach. You will descend from the overhead stack and fly by the carrier just outboard on the starboard side at 800 feet. You will execute an overhead ‘break’ to the left and enter the landing pattern.
At ¾ nm behind the ship, you will enter ‘the groove’ and report in with the Landing Signal Officer (LSO) with a ‘BALL’ radio call. You will fly the rest of the approach and landing based on visual indications on the IFLOLS ball and verbal instructions given by the LSO.
If all goes well, you will catch one of the arresting wires with your tailhook and taxi to parking. If not, you will either ‘waveoff’, abort the approach and reenter the landing pattern, or ‘bolter’, touch down on the deck and reenter the landing pattern.
¶ Important Resources
General
Carrier Procedures
Case 1 Recovery Tutorial - Jabber's YouTube Video
Banklers Case 1 Recovery Trainer Mission - Excellent mission file to learn/practice the Case 1 Recovery
For Students/Proctors
Proctor Guide and Qualification Rubric
Proctor Form (to be filled out during quals)
C1 Qual Form Results
For Instructors
Case 1 Presentation
¶ Terminology
{{ Define terminology in a markdown table }}
¶ Presentation
¶ Radio Communications
Radio Calls In Action
Within 50nm of the boat:
302: "Marshal, 302. Marking mom's 270 for 50, angles 15, state 6.9"
Marshal: "302, Marshal. Mother's weather is visibility 10+ miles, clouds scattered at 15, altimeter 29.92. Case 1 recovery, expected BRC is 150. Report 'see you at 10'.
302: "302"
- If you were leading a section or flight and had other jets with you, the initial call would be modified to sound like this:
302: "Marshal, 302, holding hands with 303 and 313. Marking mom's 270 for 50, angels 15, low state 4.2"
Before 10nm of Mom and once you have visual of the carrier:
302: "302, See you at 10"
Marshal: "302, update state, switch Tower"
302: "302, 6.5"
302 then switches radio to Tower's frequency
3nm from the stack:
302: "Tower, 302. Overhead angels 3, state 4.2"
Tower: "302, Tower. Roger"
Commencing:
Tower: "302, Tower. BRC is 150. Your signal is Charlie."
302: "302."
302 switches to Paddles/LSO frequency
In the break
302: "302. In the break."
Ball Call
302 "302. Hornet ball, 3.8"
Paddles: "Rooger ball."
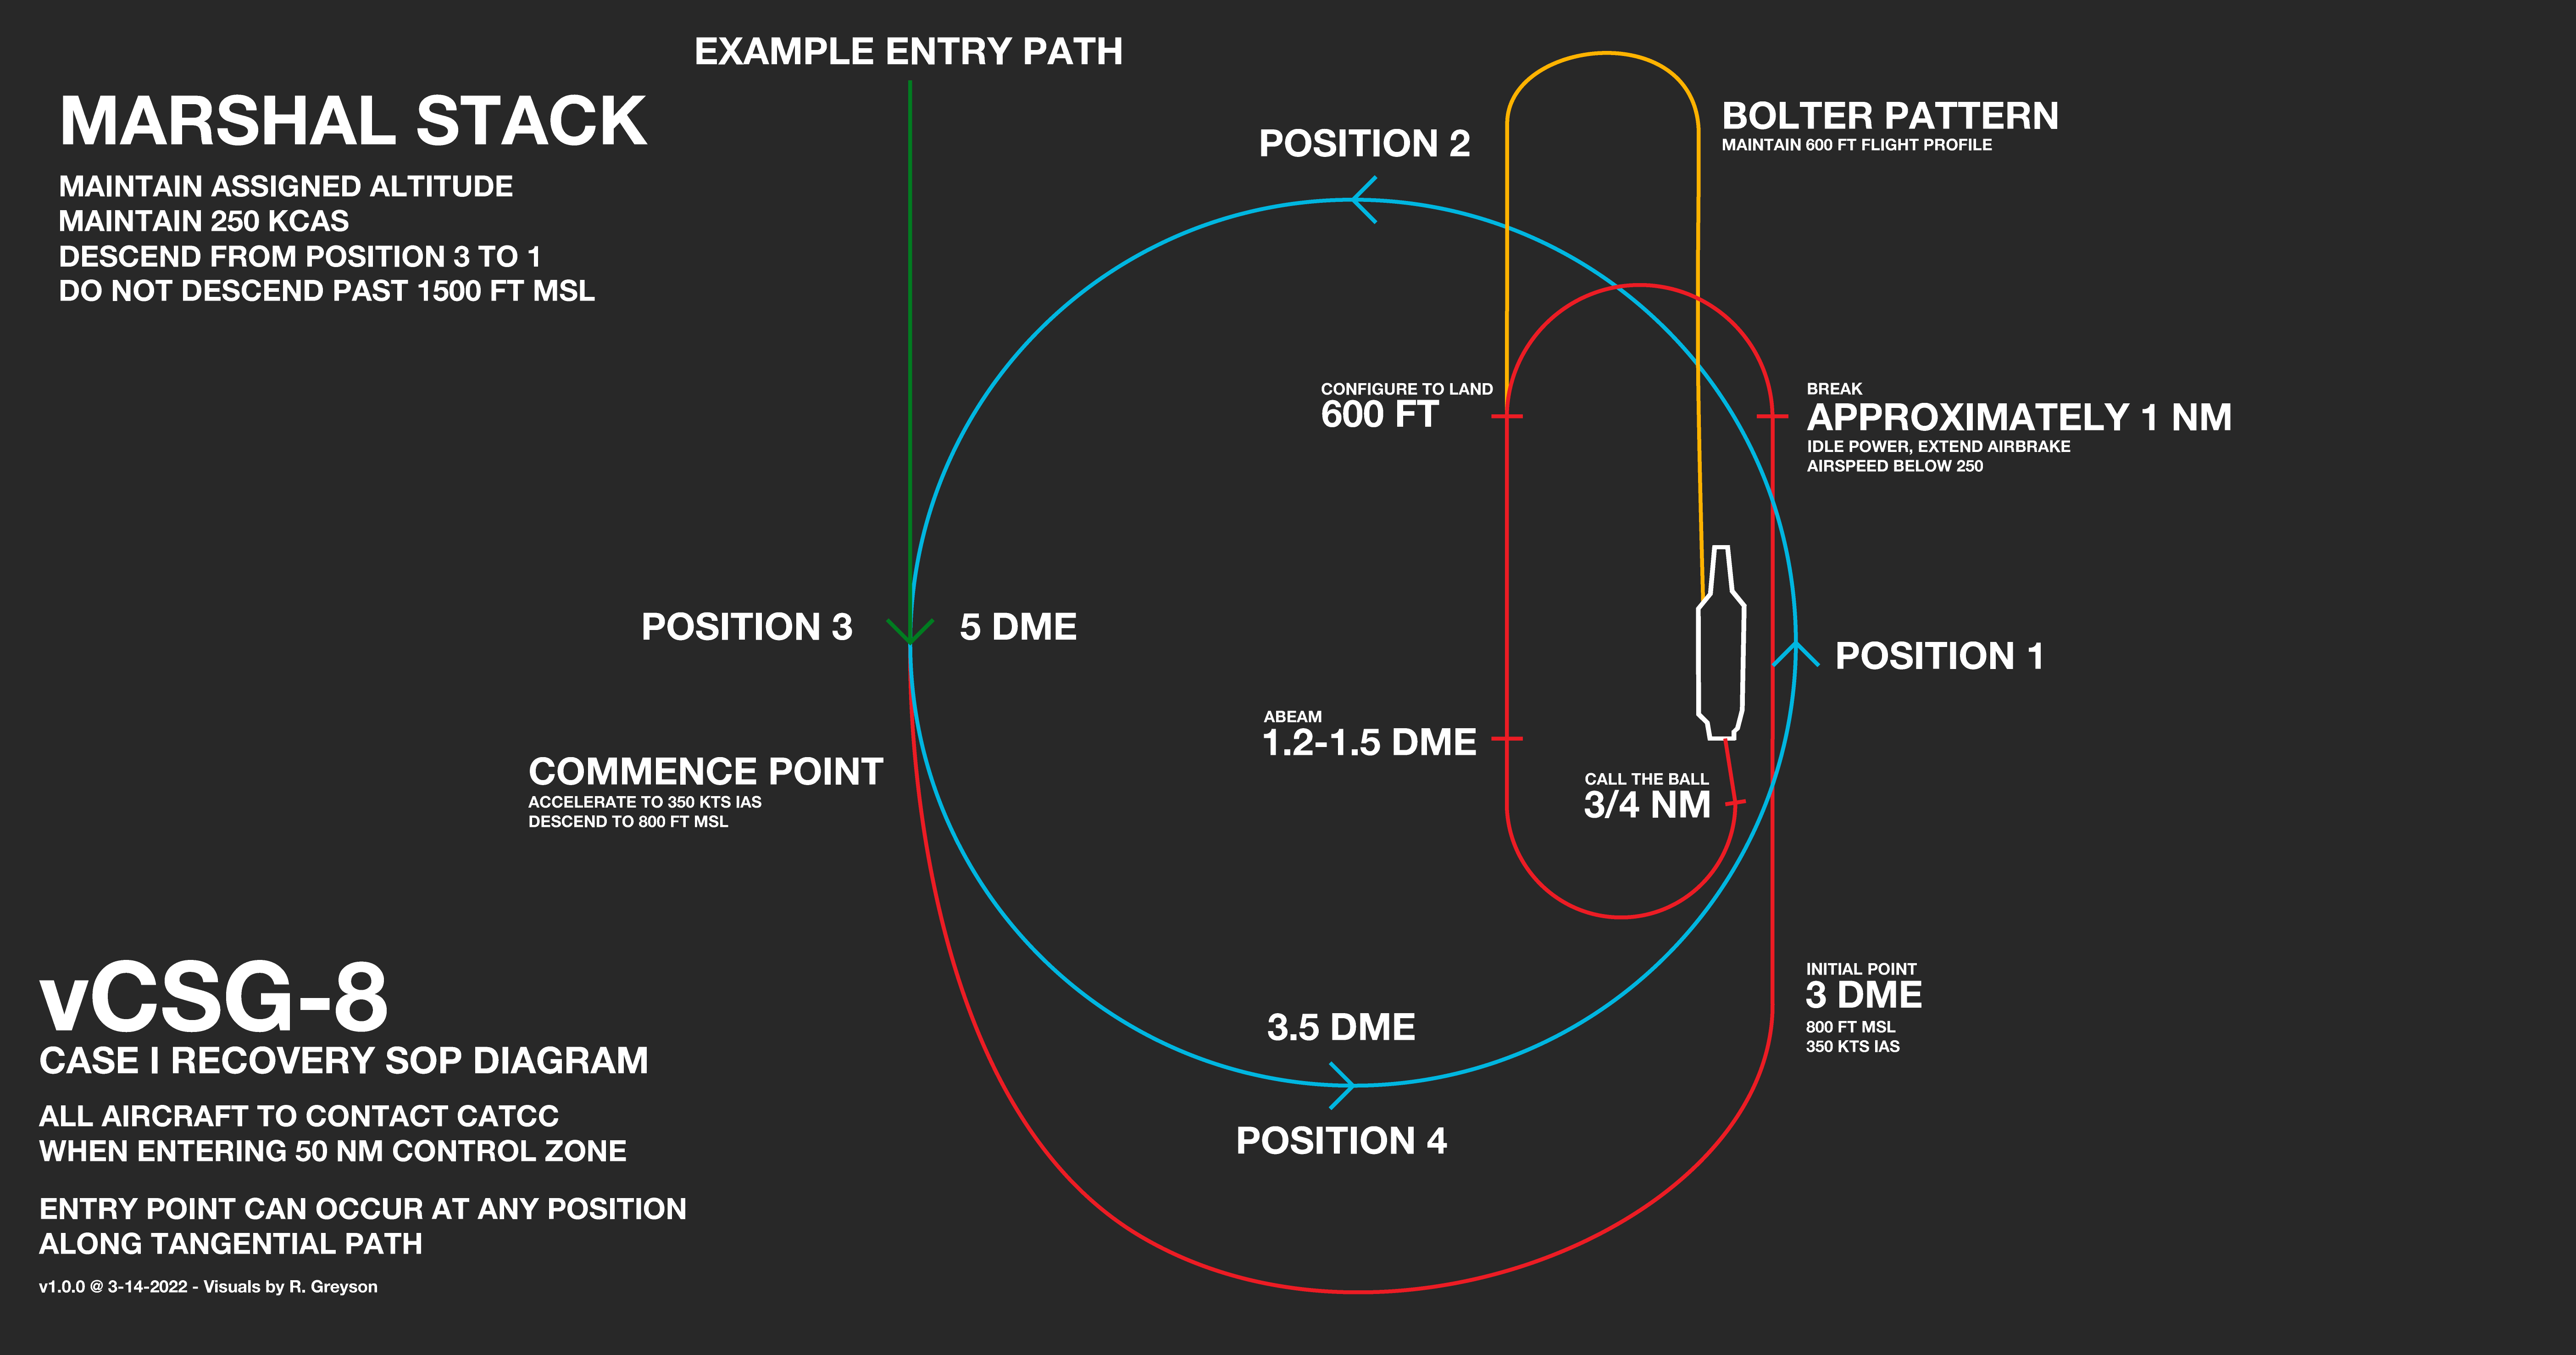
¶ Case 1 Diagram

¶ Marking Moms
Once you reach 50 miles from Mom you should be making your "Marking Mom's" call to let Marshal know you are inbound and intend to land. The radio call provides Marshal with your location and fuel state, and if there are any other jets "holding hands" with you.
Take note that the bearing you are providing in the call is the bearing of the ship to you. So if the ship is due South from your position, or 180 degrees, you should provide the reciprocal to 180, which is 360. This makes it much easier for Marshal to locate you, which is helpful because they are likely managing a lot of aircraft at the same time and could be task saturated already.
Marshal will respond with the weather conditions at the boat, the recovery type, expected BRC, and marshal instructions. It's a good idea to have a scratchpad handy to jot down the instructions as you receive them.
Radio Calls In Action
Within 50nm of the boat:
302: "Marshal, 302. Marking mom's 270 for 50, angels 15, state 6.9"
Marshal: "302, Marshal. Mother's weather is visibility 10+ miles, clouds scattered at 15, altimeter 29.92. Case 1 recovery, expected BRC is 150. Report 'see you at 10'.
302: "302"
- If you were leading a section or flight and had other jets with you, the initial call would be modified to sound like this:
302: "Marshal, 302, holding hands with 303 and 313. Marking mom's 270 for 50, angles 15, low state 4.2"
Take note:
- 302 added "holding hands with 303 and 313" which indicates to Marshal that he has two jets (side numbers 303 and 313) with him.
- The fuel state portion of the call which was originally "state 6.9" for a single jet has been modified to "low state 4.2" which tells Marshal the jet with the lowest amount of fuel in the flight has a fuel state of 4.2
After you receive your marshal instructions, start making your way towards the carrier and make sure you are on your assigned altitude by the time you are 10nm from the carrier.
¶ See you at 10
After checking in with Marshal and receiving your marshal instructions, proceed towards the carrier and begin your descent to your assigned altitude so that you arrive "on altitude" by the time you are 10nm from the carrier.
The next radio call, "See you at 10", is to inform Marshal that you have visual of Mom and will be entering the airspace immediately surrounding the carrier. Note: You don't need to wait until 10nm to make the call. If you see Mom at 15nm, you can call "See you at 15".
Marshal's acknowledgement will provide you instructions to switch to Tower's frequency and update your fuel state. Before switching your radio to Tower, your last call to Marshall, "302, 6.5", will be an acknowledgement of their instruction and your updated fuel state.
Radio Calls In Action
Before 10nm of Mom and once you have visual of the carrier:
302: "302, See you at 10"
Marshal: "302, update state, switch Tower"
302: "302, 6.5"
302 then switches radio to Tower's frequency
¶ Overhead
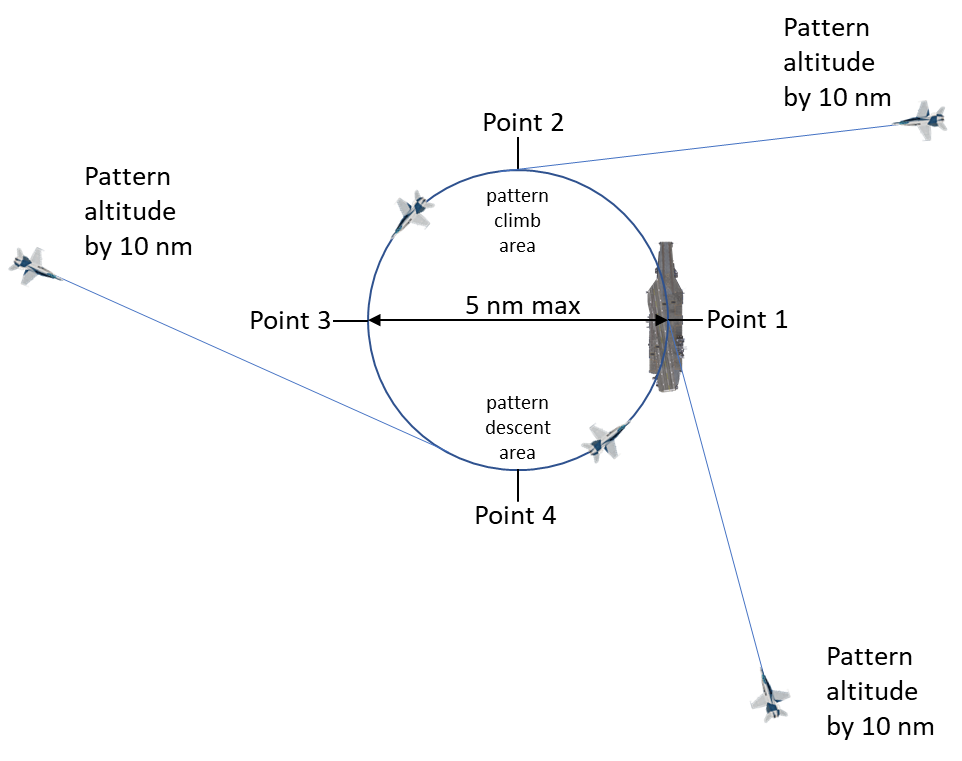
The overhead holding pattern is a left-hand pattern, with Point 1 located directly overhead the carrier and Points 2, 3 and 4 following in 90-degree increments. This holding pattern is referred to as the “stack”. All aircraft must remain within 5 nm of the carrier and no lower than 2,000 feet AGL.
You can enter the stack from any point in the stack, as long as you enter tangentially (see image below).
Any climbs must be accomplished between points 1 and 3 while any descents must be accomplished between points 3 and 1.

Once you are 3nm from the stack (not the boat), you make a radio call to Tower to inform them you are inside their airspace and about to enter the overhead stack.
Radio Calls In Action
3nm from the stack:
302: "Tower, 302. Overhead angels 3, state 4.2"
Tower: "302, Tower. Roger"
Once in the overhead stack, maintain 250 KIAS and your assigned altitude. It is important to keep an eye on the jets below you who are also in the stack, because most of the time it will be up to you to determine when to "collapse" (to descend to the next lowest stack altitude; -1,000 feet). In some cases, Tower will make the call "302, collapse" to instruct you to do so.
Important note:
Each stack altitude can accommodate 4 jets in total, so long as they are keeping appropriate intervals.
Possible interval scenarios are;
- A flight of four in formation
- Two sections on opposite sides of the stack
- Four equally spaced jets.
¶ Commencing
Once Tower is ready for you to begin your approach, they will make a radio call for you to commence.
When you pass point 3 in the stack you are to exit the stack, begin descending towards 800 feet and accelerating to 350 KIAS. An arcing turn will be flown to the "initial point" 3nm astern of the ship.
Aim to have altitude, airspeed, and position completely solved by 3nm, this is called “the initial” when heading for the break. Start looking for traffic ahead of you in the break, in the downwind, or in the groove.
Once you reach the initial point, maintain your speed and altitude (350 KIAS and 800 feet) while flying parallel to the BRC. Your goal is to pass over the ship to its starboard side (right side).
Radio Calls In Action
Commencing:
Tower: "302, Tower. BRC is 150. Your signal is Charlie."
302: "302."
302 switches to Paddles/LSO frequency
¶ In the Break / Downwind

Once you reach 1nm upwind, or you have proper spacing on your interval, you're ready to break.
Bank left and pull to initiate your break. A good rule of thumb is to adjust your pull so that your G's maintain 10 percent of your speed. Since you start at 350 KIAS, you would pull to 3.5 G's. Once you reach 300 knots, you should have eased off your pull and be at 3.0 G's. At 250 KIAS, 2.5 G's, etc. Deploy speedbrake as required.
STAY LEVEL IN THE BREAK!
This is extremely important because only 200 feet separates break traffic (800ft) from pattern traffic (600ft) and only 100 feet separates pattern traffic (600ft) from departing traffic (500ft)
About halfway through the turn you should be just below 250 KIAS and able to drop your gear and go full flaps. Retract your speedbrake.
The goal is to be 1.3-1.5 abeam and on-speed. Manage the rest of the turn to put yourself in the correct position and once you are wings level, you can begin to trim the jet for on-speed AOA. Trim so that the E bracket is completely centered on your velocity vector. Once trimmed you will now use your throttle to control altitude.
¶ Turn to the Groove
The "180"
Begin your descent to pattern altitude of 600 feet and continue flying downwind until you reach the "180", or about 5 seconds after you pass the stern of the ship. Once you are at the "180" position, you will be able to see the ramp on the stern of the ship. Give it a couple of seconds and you're ready to begin your turn to the groove.
You will want to increase power slightly before you begin your turn because as you increase your AOB (Angle of Bank) you will lose lift. The small power input will help you maintain lift and control your altitude. Maintain between 27-30 AOB through the entire turn and use your throttle to maintain between 100-200 fpm (feet per minute) descent rate. The velocity vector should be just barely below the horizon.
The "90"
As you continue turning and descending, you will eventually be pointing perpendicular to BRC. This is the 90. If you started at 600’ AGL and followed the correct descent rate of 100-200 FPM, you should be at 500’ AGL. If you nailed it, increase your descent rate to 300-400 FPM. If not, you will need to increase more or less appropriately. You should also have cut your abeam distance in half. If you were at 1.4 nm abeam, you should be at 0.7 now. If not, you are either tight or wide. This will affect the rest of the turn. If you turned late from the 180, shallow your descent rate.
The "45"
Halfway between the “90” and the ship will be the “45” position. It is visually marked by the wake of the ship. If you set your RADALT correctly, it should go off at this position. In other words, your altitude here should be 370’ AGL. This is your first opportunity to actually look outside of the cockpit and take a peek at the ship. However, you should still be flying 300-400 FPM and 27-30 degrees AOB. If you can assess visually that you will overshoot the centerline or you are very wide, correct your AOB appropriately to tighten it up or straighten out respectively.
Transitioning to the "Groove"
The groove is the wings-level portion at the very end of the approach turn. Shortly after the “45,” you should be approaching extended centerline of the LA. Before rolling wings-level, remove some power by decreasing throttle and then resetting. We are about to regain lift by getting our wings back under us, and we do not want to “balloon” or climb.
As we roll wings-level, we are looking for our descent rate to be 650-750 FPM. The velocity vector should be 3 degrees down and near the LA. Make sure to un-cage your HUD! If you are trimmed correctly, you are done with longitudinal stick inputs. Only use lateral stick inputs to correct centerline deviations, and use your throttle to work your altitude and descent rate.
¶ Ball Call / Flying the Ball
In a Case 1 Recovery, you should not have to be asked by the LSO to call the ball.
As soon as you hit centerline, or roll wings level (ideally both at the same time), go ahead and call it.
Sidenumber - Aircraft - Ball - Fuel State
“301 Hornet ball 3.8”
Radio Calls In Action
Ball Call
301 "301. Hornet ball, 3.8"
Paddles: "Rooger ball."
When flying the ball, you want the ball to be centered between the horizontal line of green “datum” lights or above them. NEVER BELOW. If it is showing low, add power to bring it back up.
Here are the “Rules to Live By”:
- Correct a “low” ball and “slow” AOA immediately.
- Correct a “high” ball and “fast” AOA slowly.
- If you’re both “low” and “slow,” fix the low first! Power!
- If you’re both “high” and “fast,” fix the fast first! Fly on-speed AOA!
- Never try to fix a “high” ball close to the ship.
- Fly the ball all the way to touchdown (don’t cut your throttles to idle!)
¶ Bolter / Wave-off
Upon boltering or waving off, stay configured, turn to fly BRC, and ascend to 600 feet. Remember, you are now 100 feet above departing traffic and 200 feet below breaking traffic so it is very important to maintain pattern altitude at 600 feet.
If you’re going straight to the pattern, immediately after waving off, boltering, or performing a touch & go, LOOK UP! Is there break traffic above you? If they can’t see you, you have to follow them. Fly straight ahead at 600’ AGL until they break, and then wait until they’re at your 8 o’clock before turning downwind. Otherwise, quickly scan the pattern ahead of you in the upwind, and left of you in the crosswind and downwind. Find your interval.
There are two reasons we care about interval. The first is so you have to pay attention to where other jets are, so you don’t fly into them. The second is so you have the proper distance behind the guy in front of you, so he has time to expeditiously get out of the LA when he traps and doesn’t foul the deck for you. Aim to trap 55 to 60 seconds behind the guy in front of you. Typically, if you’re in the downwind, you should see your interval trapping on the ship at your 9 o’clock as you’re passing abeam.
¶ Key Takeaways
¶ Memory Recall Items
{{ List any items that students should practice committing to recall, things they should be able to do without looking it up again }}
¶ Evaluation
{{ iframe to Google Form Quiz }}